Image processing is the process of performing some mathematical functions and operations on an image, images or video. The output that we get after image processing is a set of parameters or some altered image, images or videos.
Due to the low price of the Raspberry Pi, it is being used for image processing and video processing in many projects.
MMAL (Multimedia Abstraction Layer)
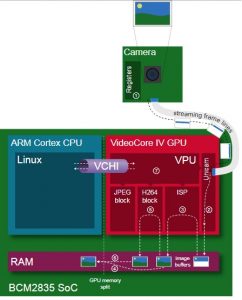
The MMAL layer below picamera provides a greatly simplified interface to the camera firmware running on the GPU. Conceptually, it presents the camera with three “ports”: the still port, the video port, and the preview port. The following sections describe how these ports are used by picamera and how they influence the camera’s behavior.
![]()
The Still Port
Firstly, the still port. Whenever this is used to capture images, it (briefly) forces the camera’s mode to one of the two supported still modes (see Sensor Modes) so that images are captured using the full area of the sensor. It also uses a strong noise reduction algorithm on captured images so that they appear higher quality.
The still port is used by the various capture() methods when their use_video_port parameter is False (which it is by default).
The Video Port
The video port is somewhat simpler in that it never changes the camera’s mode. The video port is used by the start_recording() method (for recording video), and is also used by the various capture() methods when their use_video_port parameter is True. Images captured from the video port tend to have a “grainy” appearance, much more akin to a video frame than the images captured by the still port (this is due to the still port using the stronger noise reduction algorithm).
The Preview Port
The preview port operates more or less identically to the video port. The preview port is always connected to some form of output to ensure that the auto-gain algorithm can run. When an instance of PiCamera is constructed, the preview port is initially connected to an instance of PiNullSink. When start_preview() is called, this null sink is destroyed and the preview port is connected to an instance of PiPreviewRenderer. The reverse occurs when stop_preview() is called.
Pipelines
This section attempts to provide detail of what MMAL pipelines picamera constructs in response to various method calls.
The firmware provides various encoders which can be attached to the still and video ports for the purpose of producing output (e.g. JPEG images or H.264 encoded video). A port can have a single encoder attached to it at any given time (or nothing if the port is not in use).
Encoders are connected directly to the still port. For example, when capturing a picture using the still port, the camera’s state conceptually moves through these states:

![]()
As you have probably noticed in the diagram above, the video port is a little more complex. In order to permit simultaneous video recording and image capture via the video port, a “splitter” component is permanently connected to the video port by picamera, and encoders are in turn attached to one of its four output ports (numbered 0, 1, 2, and 3). Hence, when recording video the camera’s setup looks like this
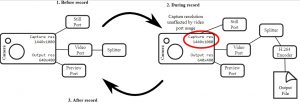
![]()
And when simultaneously capturing images via the video port whilst recording, the camera’s configuration moves through the following states:
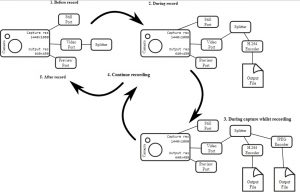
![]()
Now we can see the some commands and codings for image processing
Connect the Camera Module
First of all, with the Pi switched off, you’ll need to connect the Camera Module to the Raspberry Pi’s camera port, then start up the Pi and ensure the software is enabled.
Steps to connect the Picam with Raspberry pi board:
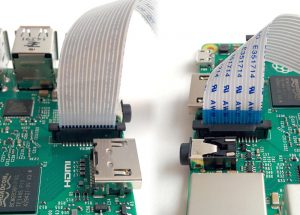
Locate the camera port and connect the camera:
Gently pull up on the edges of the plastic clip
Insert the camera ribbon; make sure it is the right way round
Push the plastic clip back into place
Start up the Pi.
Open the Raspberry Pi Configuration Tool from the main menu:
Ensure the camera software is enabled in configuration option
If it’s not enabled, enable it and reboot your Pi to begin.
Camera preview
Now your camera is connected and the software is enabled, you can get started by trying out the camera preview.
Open Python 3 or Python 2 (depends on the version of OS installed in Pi) from the main menu
Open a new file and save it as camera.py. It’s important that you do not save it as picamera.py.
Enter the following code
from picamera import PiCamera
from time import sleep
camera = PiCamera()
camera.start_preview()
sleep(10)
camera.stop_preview()
Save with Ctrl + S and run with F5. The camera preview should be shown for 10 seconds, and then close. Move the camera around to preview what the camera sees. The live camera preview should fill the screen like so:

![]()
Note that the camera preview only works when a monitor is connected to the Pi, so remote access (such as SSH and VNC) will not allow you to see the camera preview
If your image was upside-down, you can rotate it with the following code:
camera.rotation = 180
camera.start_preview()
sleep(10)
camera.stop_preview()
You can rotate the image by 90, 180, or 270 degrees, or you can set it to 0 to reset.
The most common use for the Camera Module is taking still pictures.
Amend your code to reduce the sleep and add a camera.capture() line:
camera.start_preview()
sleep(5)
camera.capture('/home/pi/Desktop/image.jpg')
camera.stop_preview()


It’s important to sleep for at least 2 seconds before capturing, to give the sensor time to set its light levels.
Run the code and you’ll see the camera preview open for 5 seconds before capturing a still picture. You’ll see the preview adjust to a different resolution momentarily as the picture is taken.
You’ll see your photo on the Desktop. Double-click the file icon to open it:
Now try adding a loop to take five pictures in a row:
camera.start_preview()
for i in range(5):
sleep(5)
camera.capture('/home/pi/Desktop/image%s.jpg' % i)
camera.stop_preview()
The variable i contains the current iteration number, from 0 to 4, so the images will be saved as image0.jpg, image1.jpg, and so on.
Run the code again and hold the camera in position. It will take one picture every five seconds.
Once the fifth picture is taken, the preview will close. Now look at the images on your Desktop and you’ll see five new pictures.



![]()
Recording video
Now you’ve used the camera to take still pictures, you can move on to recording video.
Amend your code to replace capture() with start_recording() and stop_recording():
camera.start_preview()
camera.start_recording(‘/home/pi/video.h264’)
sleep(10)
camera.stop_recording()
camera.stop_preview()
Run the code; it will record 10 seconds of video and then close the preview.
To play the video, you’ll need to open a terminal window by clicking the terminal icon in the taskbar:
Type the following command and press Enter to play the video:
omxplayer video.h264
The video should play. It may actually play at a faster speed than what has been recorded, due to omxplayer’s fast frame rate.
At the beginning, you created a camera object with camera = PiCamera().
You can manipulate this camera object in order to configure its settings. The camera software provides a number of effects and other configurations you can apply. Some only apply to the preview and not the capture, others apply to the capture only, but many affect both.The resolution of the capture is configurable.
By default it’s set to the resolution of your monitor, but the maximum resolution is 2592 x 1944 for still photos and 1920 x 1080 for video recording. Try the following example to set the resolution to max. Note that you’ll also need to set the frame rate to 15 to enable this maximum resolution:
camera.resolution = (2592, 1944)
camera.framerate = 15
camera.start_preview()
sleep(5)
camera.capture(‘/home/pi/Desktop/max.jpg’)
camera.stop_preview()

![]()
You can easily add text to your image with annotate_text. Try it:
camera.start_preview()camera.annotate_text="IPCS CHENNAI"sleep(5)camera.capture('/home/pi/Desktop/text.jpg')camera.stop_preview()
You can alter the brightness setting, which can be set from 0 to 100. The default is 50. Try setting it to another value:
camera.start_preview()
camera.brightness = 70
sleep(5)
camera.capture('/home/pi/Desktop/bright.jpg')
camera.stop_preview()
Try adjusting the brightness in a loop, and annotating the display with the current brightness level:
camera.start_preview()
for i in range(100):
camera.annotate_text = "Brightness: %s" % i
camera.brightness = i
sleep(0.1)
camera.stop_preview()
Similarly, try the same for the contrast:
camera.start_preview()
for i in range(100):
camera.annotate_text = "Contrast: %s" % i
camera.contrast = i
sleep(0.1)
camera.stop_preview()
You can set the annotation text size with the following code:
camera.annotate_text_size = 50Valid sizes are 6 to 160. The default is 32.
You can also alter the annotation colours. First of all, ensure that Color is imported by amending your import line at the top:
from picamera import PiCamera, ColorThen amend the rest of your code as follows:
camera.start_preview()
camera.annotate_background = Color('blue')
camera.annotate_foreground = Color('yellow')
camera.annotate_text = "IPCS CHENNAI "
sleep(5)
camera.stop_preview()
You can use camera.image_effect to apply a particular image effect. The options are: none, negative, solarize, sketch, denoise, emboss, oilpaint, hatch, gpen, pastel, watercolor, film, blur, saturation, colorswap, washedout, posterise, colorpoint, colorbalance, cartoon, deinterlace1, and deinterlace2. The default is none. Pick one and try it out:
camera.start_preview()
camera.image_effect = 'oilpaint'
sleep(5)
camera.capture('/home/pi/Desktop/oilpaint.jpg')
camera.stop_preview()


Try looping over the various image effects in a preview to test them out:
camera.start_preview()
for effect in camera.IMAGE_EFFECTS:
camera.image_effect = effect
camera.annotate_text = "Effect: %s" % effect
sleep(5)
camera.stop_preview()


                         the deinterlace effect
You can use camera.awb_mode to set the auto white balance to a preset mode to apply a particular effect. The options are: off, auto, sunlight, cloudy, shade, tungsten, fluorescent, incandescent, flash, and horizon. The default is auto. Pick one and try it out:
camera.start_preview()
camera.awb_mode = 'sunlight'
sleep(5)
camera.capture('/home/pi/Desktop/sunlight.jpg')
camera.stop_preview()
You can loop over the available auto white balance modes with camera.AWB_MODES.
You can use camera.exposure_mode to set the exposure to a preset mode to apply a particular effect. The options are: off, auto, night, nightpreview, backlight, spotlight, sports, snow, beach, verylong, fixedfps, antishake, and fireworks. The default is auto. Pick one and try it out:
camera.start_preview()
camera.exposure_mode = 'beach'
sleep(5)
camera.capture('/home/pi/Desktop/seashore.jpg')
camera.stop_preview()
You can loop over the available exposure modes with camera.EXPOSURE_MODES.
That’s the end of today’s detail about image processing on raspberry pi.
I will address remaining minutiae in our future posts.
Until then, stay tuned and muchas gracias.


