
Capabilities and Features
With Simulink Support Package for Arduino Hardware, you can use Simulink to develop and simulate algorithms that run standalone on your Arduino. The package includes:
- Hardware plugin detection for Arduino boards in MATLAB and setup screens for initial Arduino board configuration
- UDP and TCP/IP blocks in the Ethernet shield library and the Wi-Fi library to let your Arduino hardware communicate with LEGO MINDSTORMS EV3, Raspberry Pi, and mobile devices (Android and iOS) over Ethernet or Wi-Fi
- Simulink blocks for configuring and accessing Arduino inputs and outputs
- Write and read blocks to communicate directly with a Thing Speak channel from your algorithms running on an Arduino board
- Access to Arduino Wi-Fi Shield, onboard Wi-Fi chip on Arduino MKR1000, ESP8266 modules, and Ethernet Shield
- External mode for interactive parameter tuning and signal monitoring as your algorithm runs on the device (not available on some boards – see list below). Dashboard to block and Simulation Data Inspector is supported with XCP-based External mode as of R2019a.
- Model deployment for standalone operation of Arduino boards
- Simulink I/O access to peripherals connected to Arduino boards before deploying models to hardware, including digital inputs and outputs, I2C read and write, SPI write/read, analog inputs, and pulse width modulated outputs
- External Interrupt blocks let you trigger downstream Function-Call subsystems
- Documentation that guides you on how to create a device driver block to access specific features of your hardware board
- Simulink Coder lets you access the C code generated from Simulink and trace it back to the original model.
- Embedded Coder lets you generate optimized code, use code replacement libraries, and perform software-in-the-loop and processor-in-the-loop verification.
Build Arduino projects using high-level programming and block diagrams:
Arduino programming is supposed to be fun but can become frustrating and time consuming for tasks such as plotting sensor data or incorporating advanced math, signal processing, or control routines into your projects.
MATLAB and Simulink address several challenges with traditional Arduino programming. The products support two primary workflows:
- Read, write, and analyze data from Arduino sensors
- Develop algorithms that run standalone on the Arduino device
Read, write, and analyze data from Arduino sensors:
MATLAB support package for Arduino lets you write MATLAB programs that read and write data to your Arduino and connected devices such as an Adafruit motor shield, I2C, and SPI devices. Because MATLAB is a high-level interpreted language, programming with it is easier than with C/C++ and other compiled languages, and you can see results from I/O instructions immediately—without recompiling. MATLAB includes thousands of built-in math, engineering, and plotting functions that you can use to quickly analyze and visualize data collected from your Arduino.
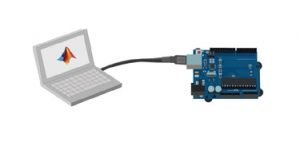
With MATLAB support packages for Arduino, the Arduino is connected to a computer running MATLAB. Processing is done on the computer with MATLAB.
Benefits of using MATLAB for Arduino programming:
- Read and write sensor data interactively without waiting for your code to compile
- Analyze your sensor data using thousands of pre-built functions for signal processing, machine learning, mathematical modeling, and more
- Quickly visualize your data using the vast array of plot types in MATLAB
Develop algorithms that run standalone on the Arduino:
Simulink support package for Arduino lets you develop algorithms in Simulink, a block-diagram environment for modeling dynamic systems and developing algorithms, and run them standalone on your Arduino. The support package extends Simulink with blocks for configuring Arduino sensors and reading and writing data from them. After creating your Simulink model, you can simulate it, tune algorithm parameters until you get it just right, and download the completed algorithm for standalone execution of the device. With the MATLAB Function block, you can incorporate MATLAB code into your Simulink model.
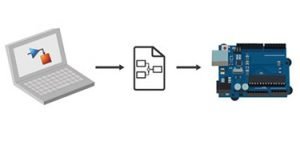
With a Simulink support package for Arduino, you develop the algorithm in Simulink and deploy to the Arduino using automatic code generation. Processing is then done on the Arduino.
Benefits of using Simulink for Arduino programming:
- Develop and simulate your algorithms in Simulink and use automatic code generation to run them on the device
- Incorporate signal processing, control design, state logic, and other advanced math and engineering routines in your hardware projects
- Interactively tune and optimize parameters as your algorithm runs on the device
- Easily modify algorithms to run on other low-cost and commercial hardware platforms
To create a MATLAB Project using Arduino:
To create simple MATLAB m-files to talk to our Arduino board. The MATLAB Support Packages for Arduino Hardware lets you use MATLAB to communicate with your board through USB cable. The support packages are available for 32-bit and 64-bit Windows, 64-bit Mac OS and 64-bit Linux.
Installing Packages:
You can easily install packages through your MATLAB.
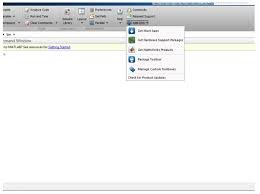
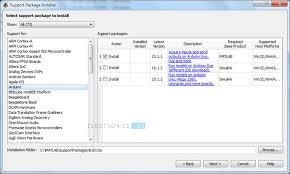
First, start MATLAB and click the Add-Ons drop-down menu. In the drop-down menu, click Get Hardware Support Packages. It will start the package installer window.
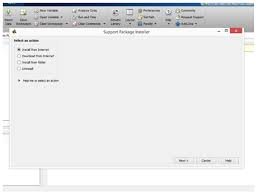
Select Install from internet and then Next.
In the next window, you will see all the available packages for MATLAB and Simulink. Select the Arduino package, then check all the packages displayed and click next to continue the installation. Note that this picture is showing that I am reinstalling the Arduino packages because I had previously installed them.
Next, the installer will ask you to log in to your Math Works account. If you don’t have an account, you can create one during installation. Accept the license agreement on the next screen and continue to download the packages. Now you have to wait for MATLAB to download and install all the required packages.
Testing:
Once the packages are installed, connect your Arduino board to your PC and type the following command in MATLAB command window
> a = arduino()
If you have more than one Arduino connected to your PC, you have to specify the board type you will be communicating with:
> a = arduino(‘com3’, ‘uno’)
MATLAB will then attempt to communicate with your board. If successful, MATLAB will display the properties of the Arduino board connected to your PC as shown below:
This information displays the port on which your board is connected, the model of your Arduino board, and available pins and libraries available for the board.
In your workspace, you will see a variable a, which is the MATLAB Arduino object. Run the following command to clear this object.
> clear a
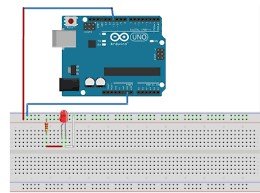
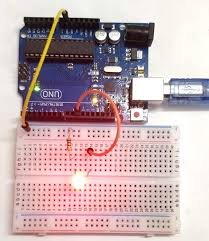
Wiring Diagram:
Connect the circuit as shown below to complete the following two examples:
Applications of Arduino MATLAB Interface:
- By interfacing Arduino with MATLAB, we can acquire Sensor Data from Arduino and start plotting various graphs.
- We can create GUI (Graphical User Interface) for controlling our Arduino with the help of MATLAB.
- A wide range of projects related to image processing and signal processing can be implemented using Arduino and MATLAB.
- Some of the projects can be Colour Detection, Object Tracking, Face Detection, etc.
Testing